Today, with the rapid advances in AI and automation, building solutions that seamlessly connect with different services is essential.
Microsoft Power Apps — a core component of the Power Platform — empowers both developers and business users to build applications using low-code tools. But the true power of Power Apps is unlocked when you use a custom connector to integrate external APIs.
In this comprehensive guide, we’ll walk you through the step-by-step process of creating a custom connector in Power Apps to connect with REST APIs and fully leverage the potential of your applications.
What Is a Custom Connector in Power Apps or Power Automate?
A Custom Connector in Power Apps (or Power Automate) is an advanced tool — essentially a wrapper — that allows you to integrate an external REST API into Power Apps or Power Automate. This becomes essential when the API or service you need isn’t available among the 750+ prebuilt connectors offered by the Power Platform.
If you want to integrate an API that isn’t natively supported, the solution is to create your own custom connector for Power Apps or Power Automate.
Custom connectors are ideal for businesses that need to connect to proprietary systems, legacy services, or third-party platforms that don’t have an official connector.
Power Platform Connectors: Types and Differences
Before creating your custom connector for Power Automate or Power Apps, it’s important to understand the different categories of connectors available:
Standard Connectors vs. Premium Connectors
| Connector Type | Description | Required License |
|---|---|---|
| Standard Power Apps Connectors | Included with basic licenses | Basic Power Apps |
| Premium Power Apps Connectors | Require a premium license | Power Apps Premium |
| Custom Connectors | User-created connectors | Premium License |
What Are Custom Connectors in Power Apps Used For?
Custom connectors significantly expand what Power Apps can do:
- Proprietary API integration: Connect to your company’s internal systems
- Specific web services: Access APIs that don’t have a native connector
- Advanced customization: Tailor functionality to meet specific business needs
- End-to-end automation: Combine Power Automate and Power Apps for complex workflows
Power Apps Custom Connector / APIs: A Table Guide
Creating custom connectors in PowerApps is vital for unlocking the platform’s full potential, facilitating seamless integration with various data sources.Creating custom connectors in PowerApps is vital for unlocking the platform’s full potential, facilitating seamless integration with various data sources.
| Section | Details |
|---|---|
| Introduction | – Microsoft Power Apps & Creating custom connectors for skill enhancement. |
| Custom Connectors in PowerApps | – Essential for extending app functionality via diverse data source integration. – Act as bridges between PowerApps and external services, enhancing app power. |
| Getting Started | – Prerequisites: Power Apps account, API access, basic REST API knowledge. – Custom connectors act as API wrappers for effective communication. |
| Configuration | – Two scenarios: creating a new custom connector or importing from an existing definition file. – Detailed steps for custom connector creation, covering general details, security, and definition setup. |
| API Information | – Example API (Reqres) used for demonstration with URL and method details. |
| Testing Custom Connector | – Step-by-step process for testing custom connectors in PowerApps. – Involves creating a connection and testing operations. |
| Power Apps Integration | – Steps for integrating custom connectors, with verification in the Data pane. – Creation of a new Gallery for utilizing the Custom Connector and API. |
| Additional Scenarios | – Export/download options for custom connectors. – Importing existing connectors from OpenAPI files. |
How to configure a Custom Connector in Power Apps to call an API?
For adding an API in Power Apps or Power Automate, there are different options available, which can be resume in 2 scenarios:
- Scenario 1: Create a new custom connector from scratch (New).
- Scenario 2: Create a new custom connector from an existing definition file (Import).
Creating a Custom Connector: Prerequisites
Before you embark on your custom connector journey, ensure you have the following in place:
- Microsoft Power Apps: You must have a Power Apps account to create custom connectors.
- Access to the API: You’ll need access to the API of the service or data source you want to connect to.
- Basic knowledge of REST APIs: Familiarize yourself with REST APIs, as custom connectors are typically built around them.
API Information for the PowerApps Custom Connector example
For this example, we will be using a free API called Reqres.
Reqres – is a hosted REST-API ready to respond to your AJAX
URL: https://reqres.in
API Get List of users method: https://reqres.in/api/users
Scenario #1- Start Creating a Custom Connector in Power Apps from Scratch
You will need to:
1- Sign in to Power Apps or Power Automate.
2- Select Custom connectors (Navigation pane on the left).
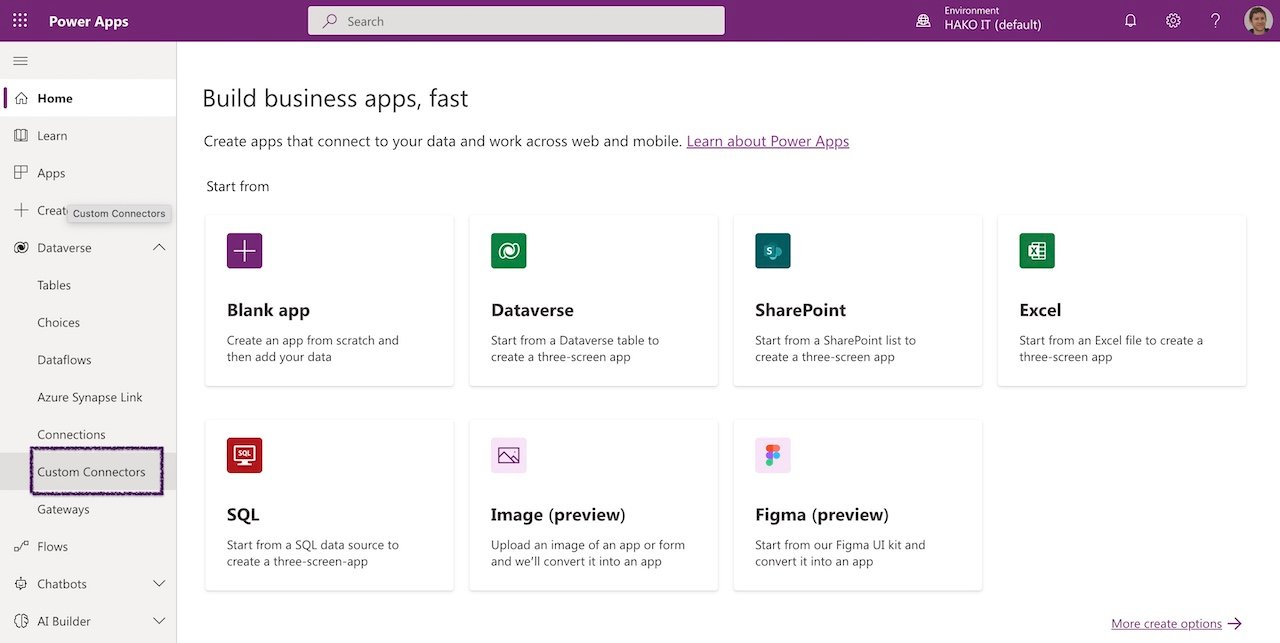
Update: Where is the Custom Connector tab in Power Apps? 👇 On the latest version of Power Apps Studio, the Custom Connector tab is no longer available by default. 👇
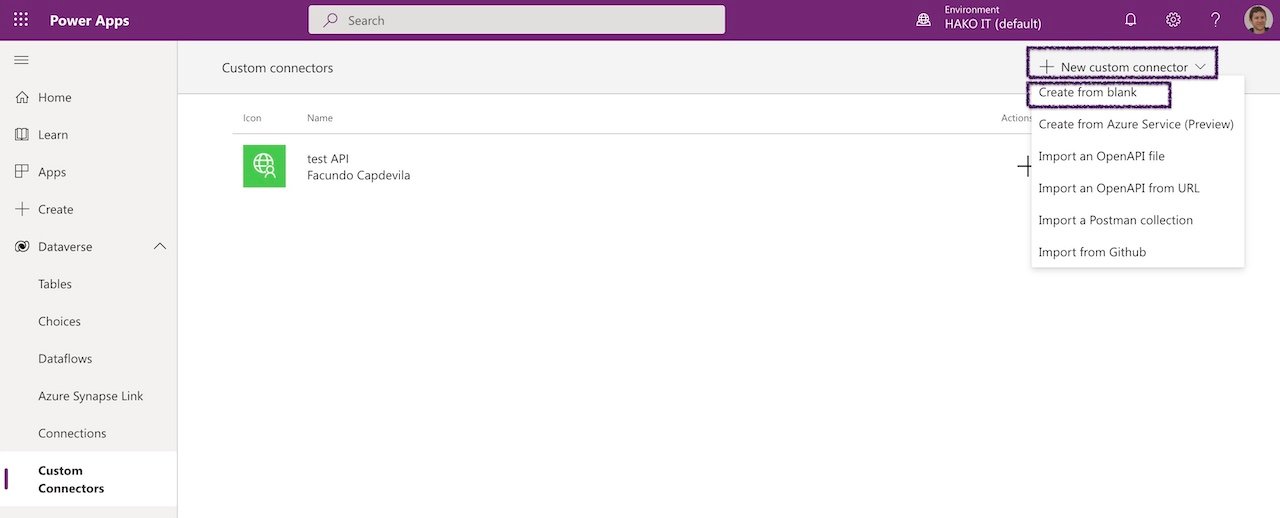
3- Select New custom Connector -> choose to Create from blank.
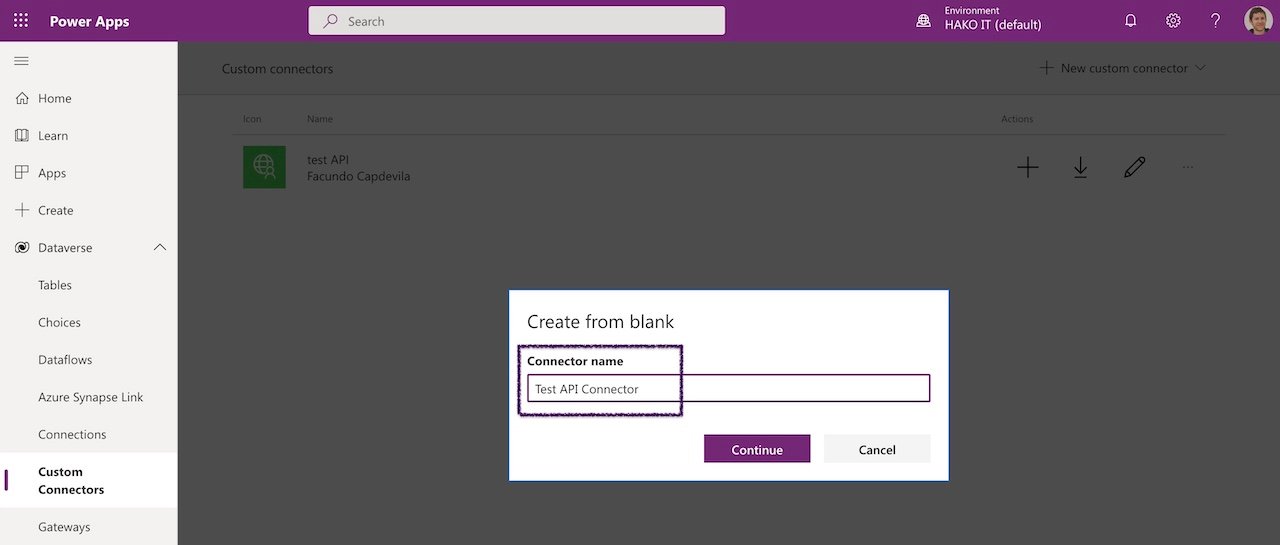
4-Enter a name for the custom connector, then select “Continue“.
Important: Notice that nowadays after creating the Connector, you cannot change the Connector name.
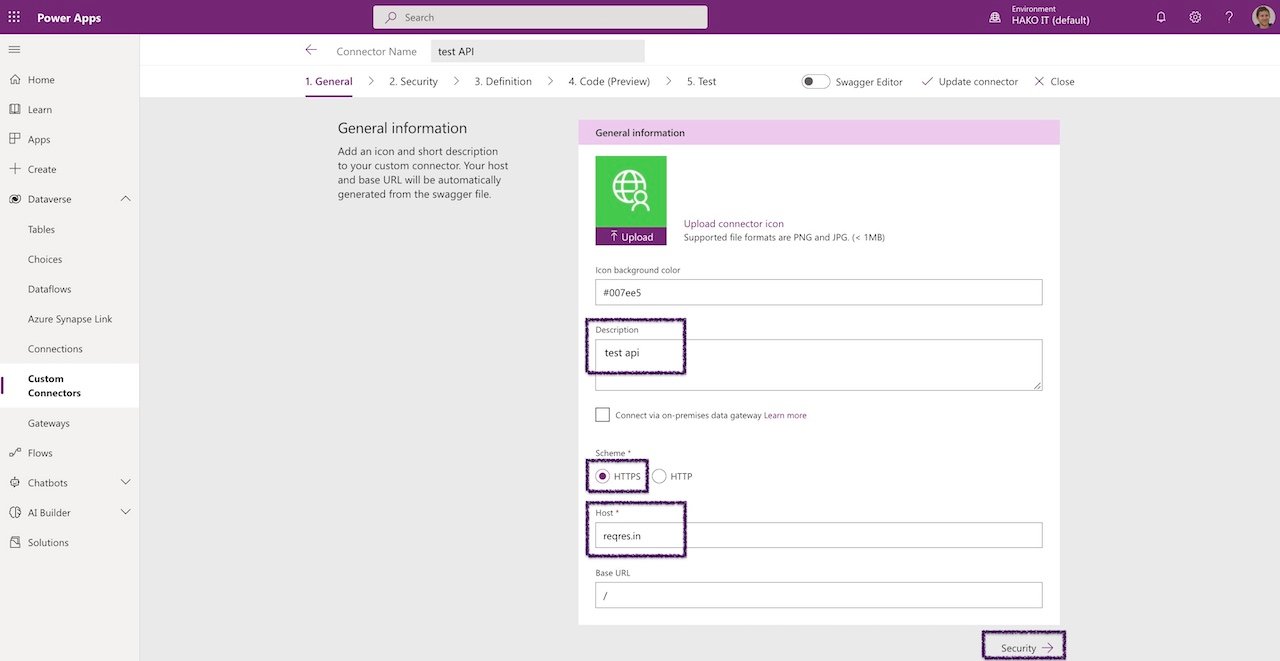
Step 1: General details of the API and Power Apps Connector
On the General tab:
- In the Description field, enter a meaningful value. This description will appear in the custom connector’s details, and it can help others know if the connector could be useful to them. Example with: test api
- Schema: HTTP or HTTPS. Example with: HTTPS
- Update Host to the address for the API Url. The connector uses the API host and the base URL to determine how to call the API. Example with: reqres.in
Note: Not enter the full API URL, as you select first the Schema (HTTP/HTTPS)
Select on Security to continue.
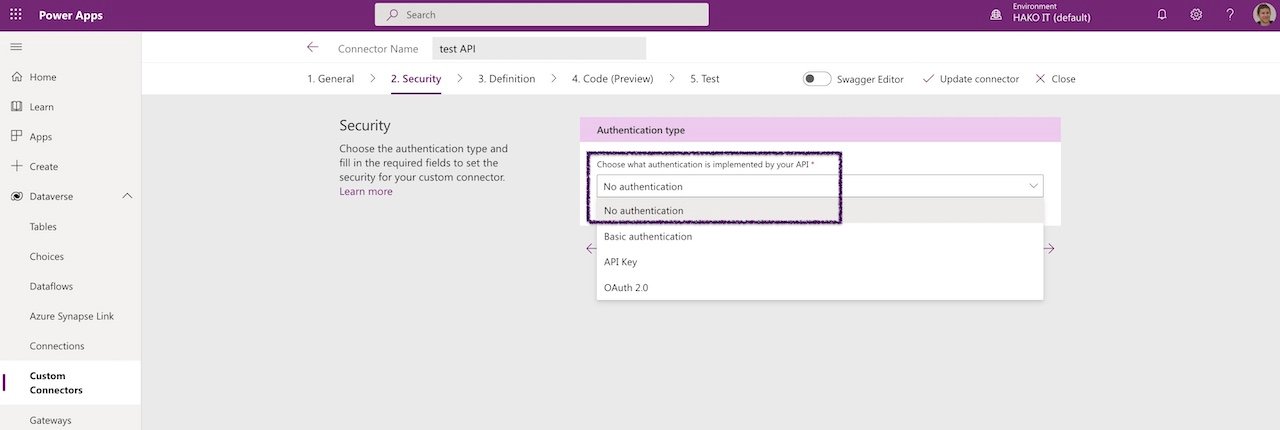
Step 2: Power Apps Custom Connector Security: Choose authentication type
On the Security tab:
2.1- Choose the authentication type. Example with: No Authentication.
Select on Definition to continue.
Step 3: Custom Connector in Powerapps definition
On the Definition tab:
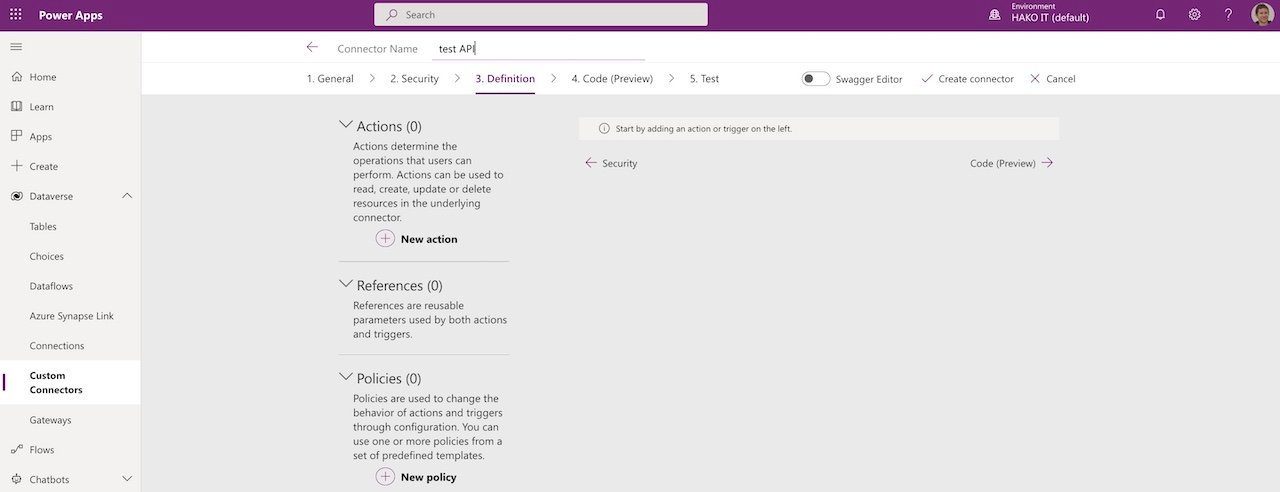
3.1- Create a New Action – Actions > Select New Action
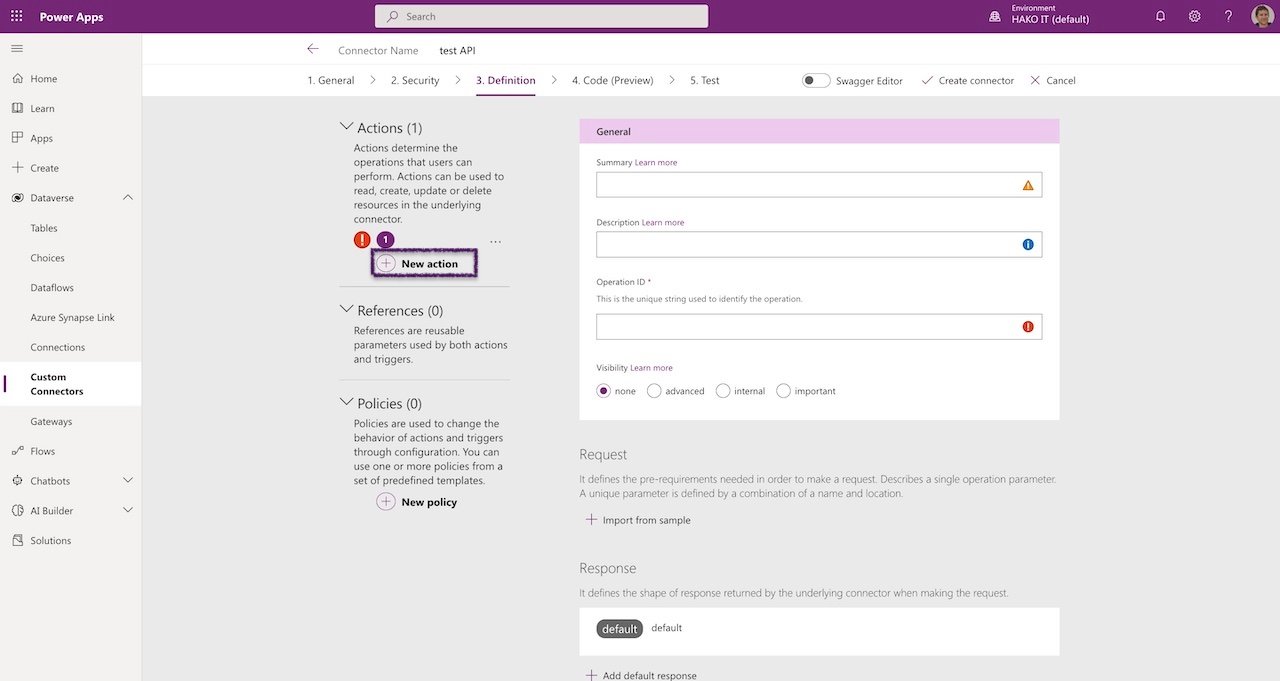
3.2- Complete the Summary / Description / Operation ID for the new action.
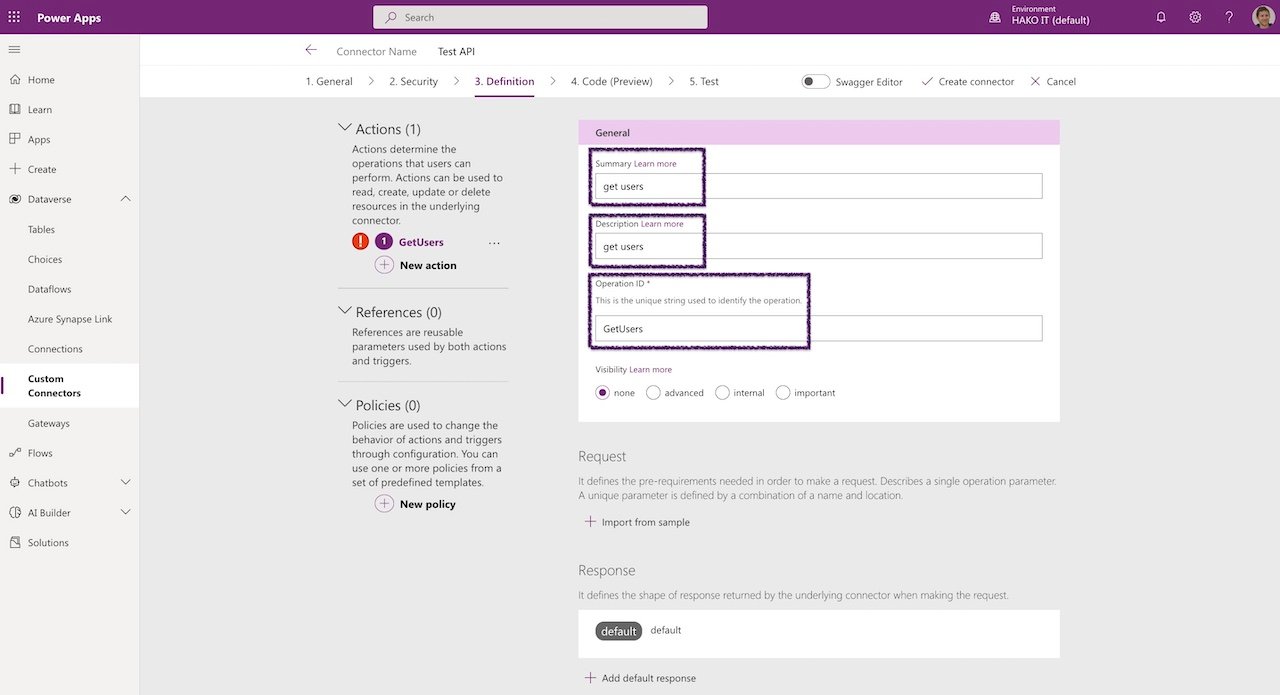
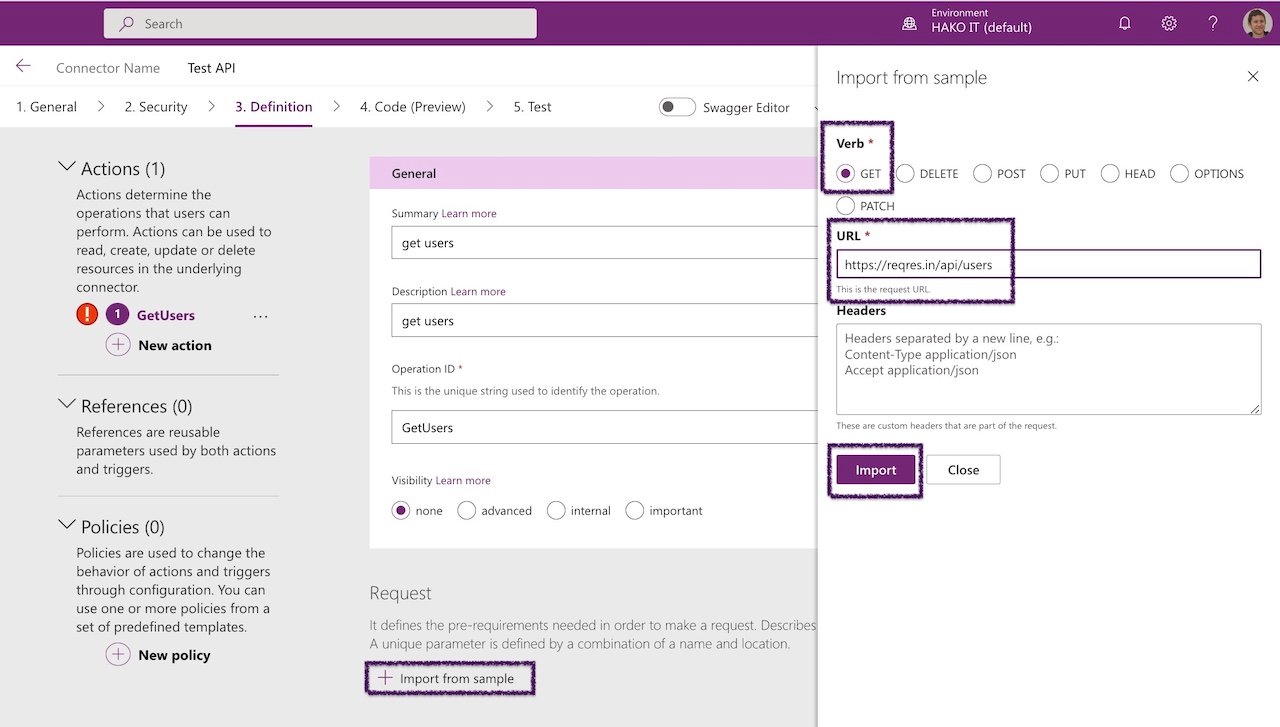
3.3- Request – Import from sample – Get List
Select Import from sample.
Example with:
Verb: GET
URL: https://reqres.in/api/users
Click Import
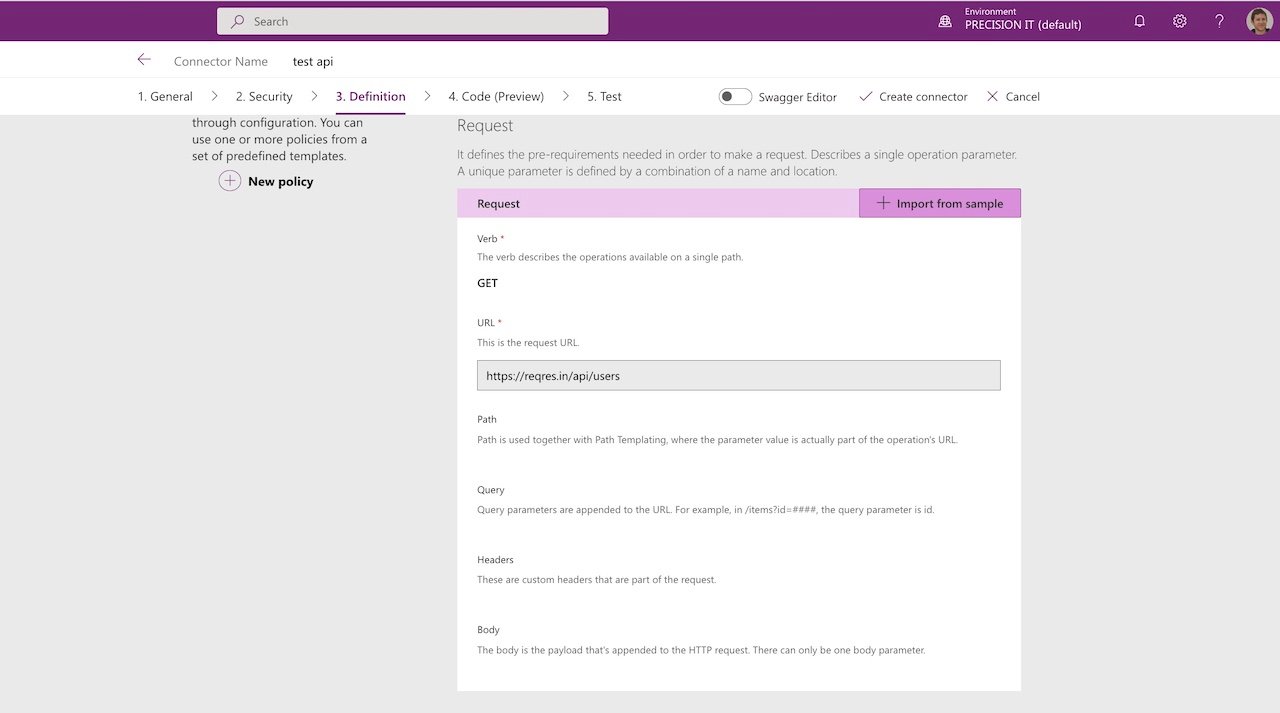
3.4- Response – Add default response – JSON Get List Response
Select Add default response

3.5- Select Import from sample
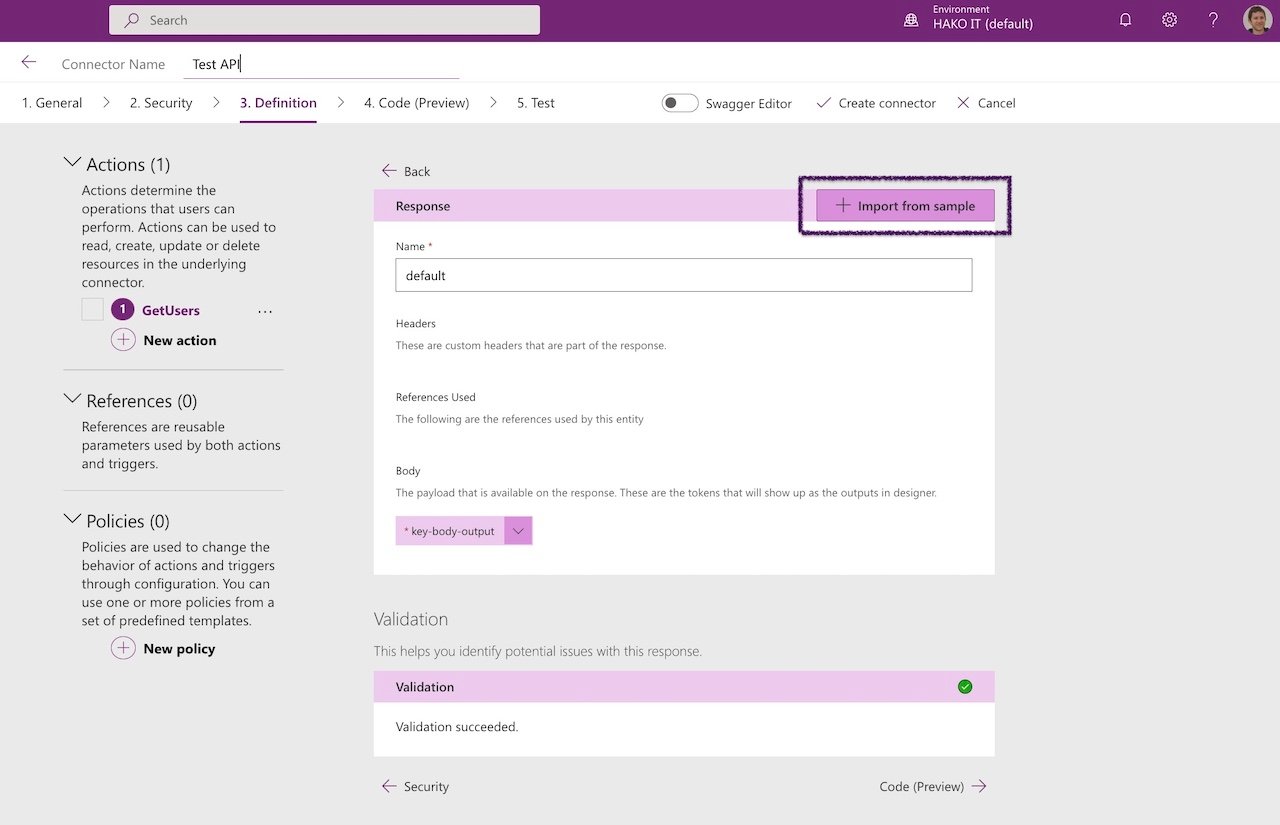
3.6- Copy a RAW JSON response from URL
In example case from the URL: https://reqres.in/api/users

Or Copy an RAW JSON response from Postman:
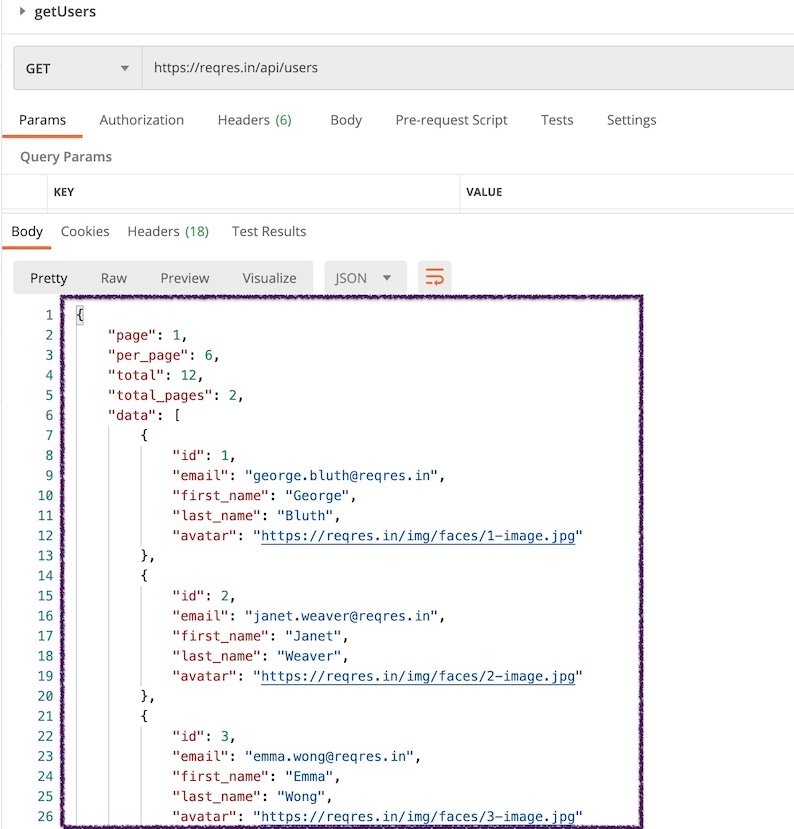
3.7- Paste Body example (as shown below):
Then, select Import
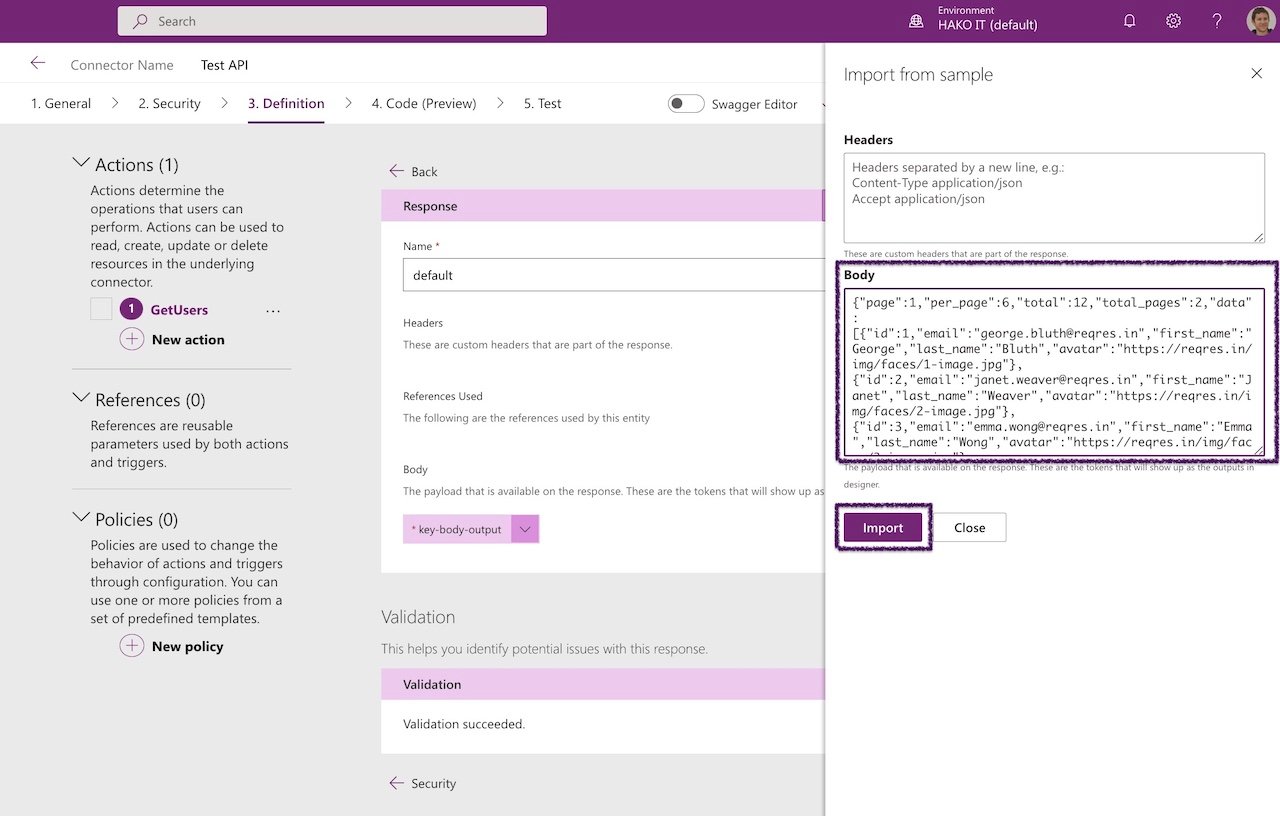
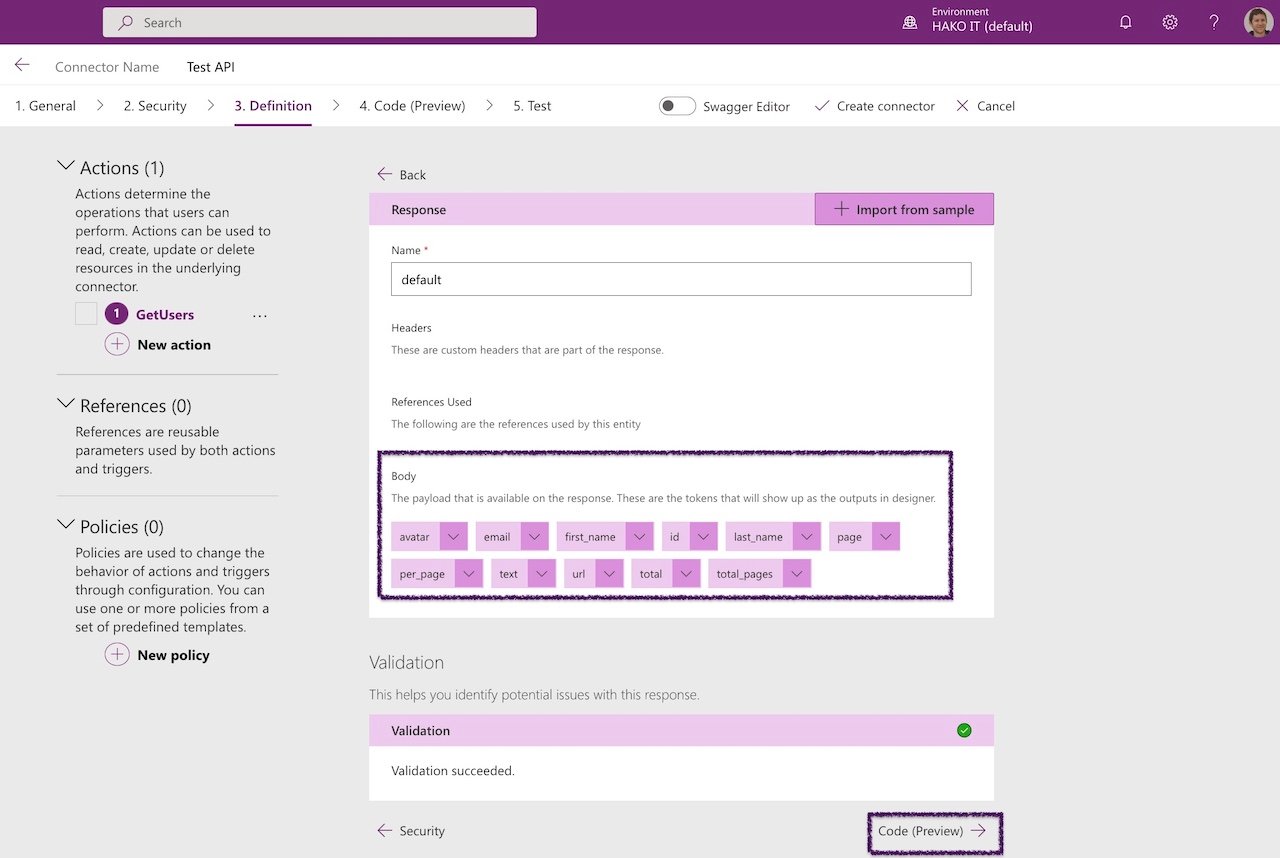
Finally you will see the properties loaded in the response.
3.8- Select on Code to continue.
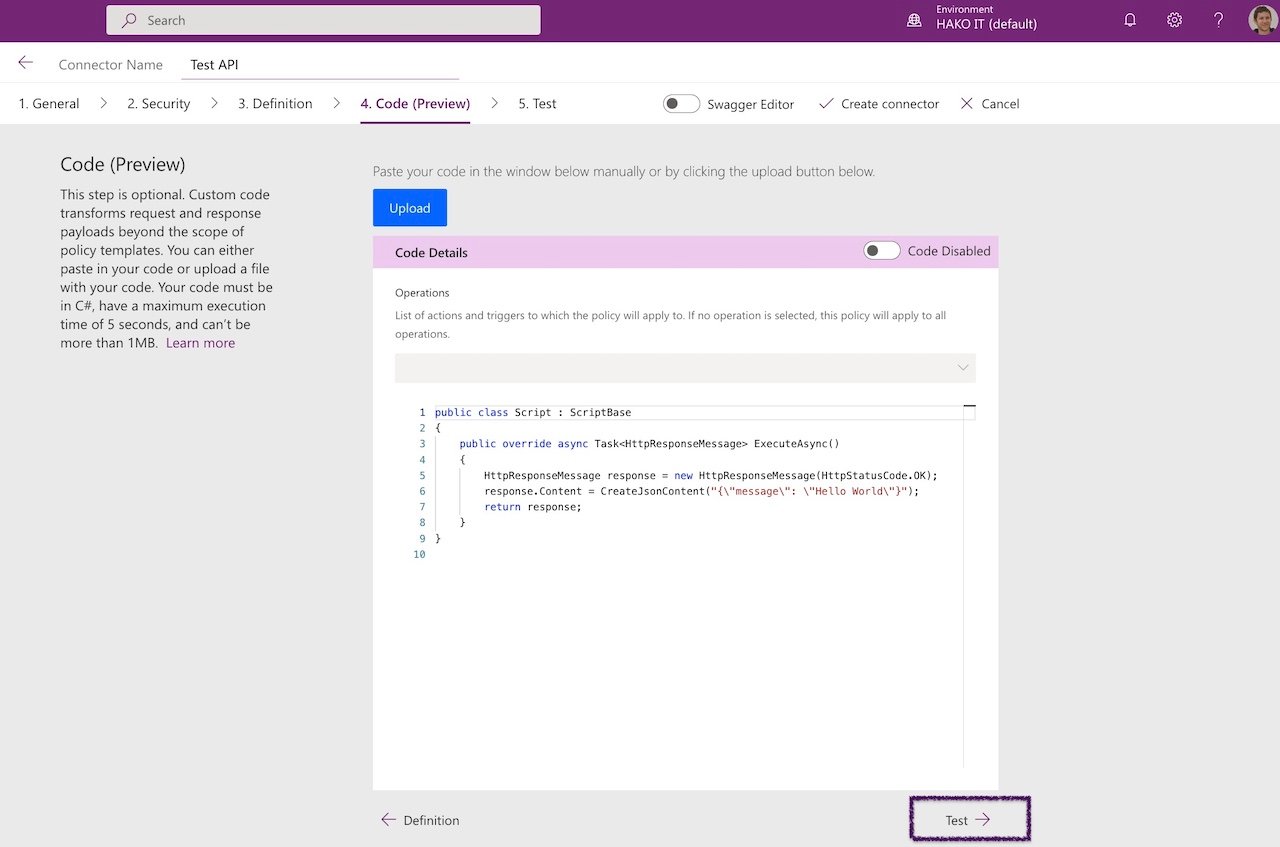
Step 4: (Optional) Using custom code on a Custom Connector in Power Apps
- This step is optional. You can complete creating your connector by passing this step and going to Step 5: Test the Custom Connector in Powerapps.
Using C# code, you can transform request and response payload data beyond the scope of existing policies. Transformations include sending an external request to fetch additional data.
On the Code tab:
4.1- Select on Test to continue.
Step 5: Test the Custom Connector in Powerapps
On the Test tab:
- For testing:
First, you have to create the connector and create a connection. Don’t worry, have the steps before.

5.1- Create Connector
Select Create Connector.

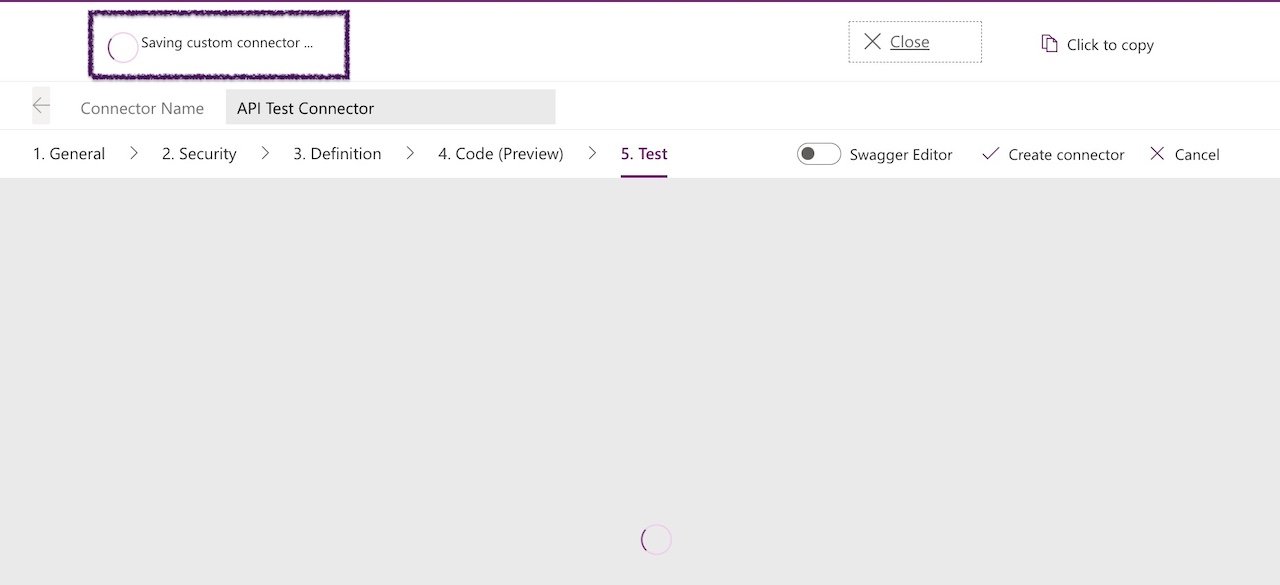
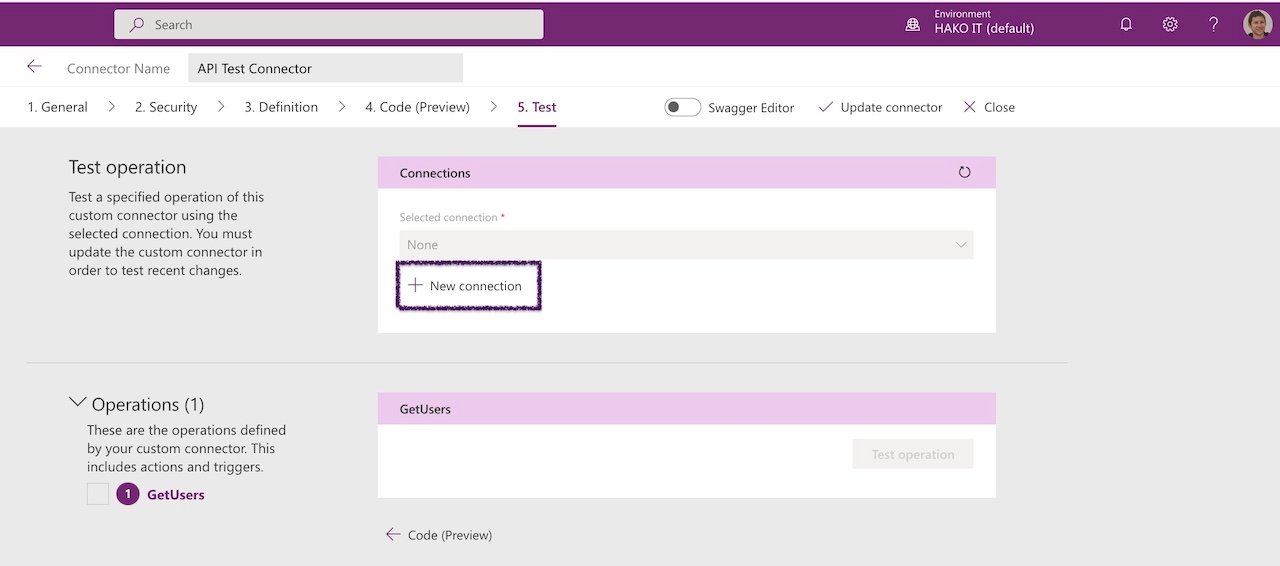
5.2- Create a new connection
Select New Connection.
Then, select Create.
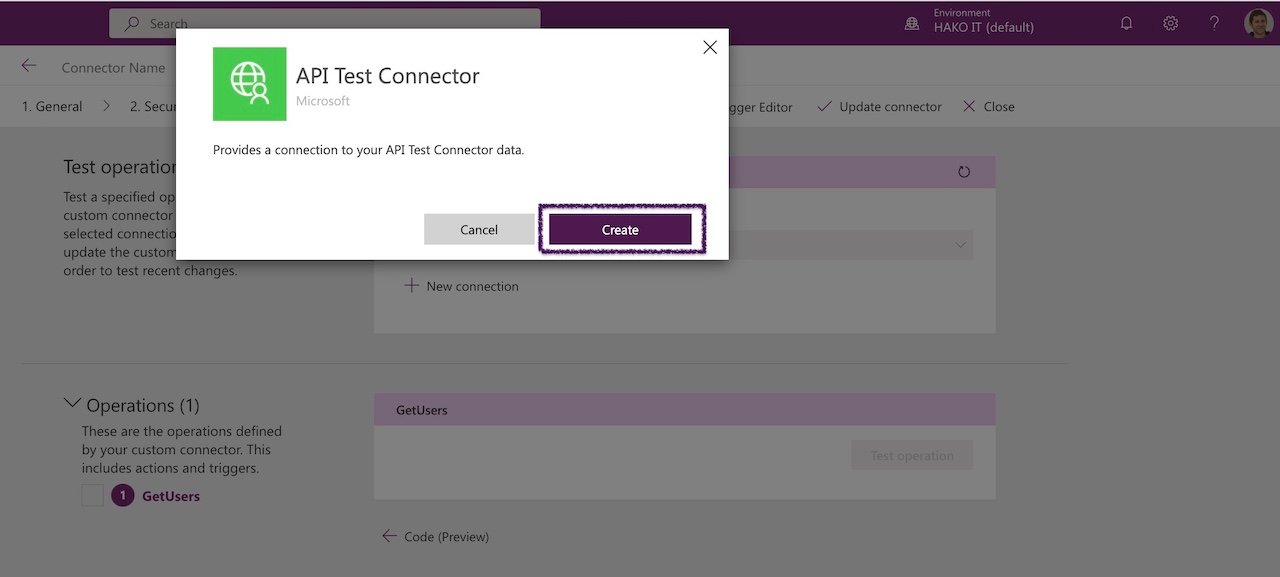
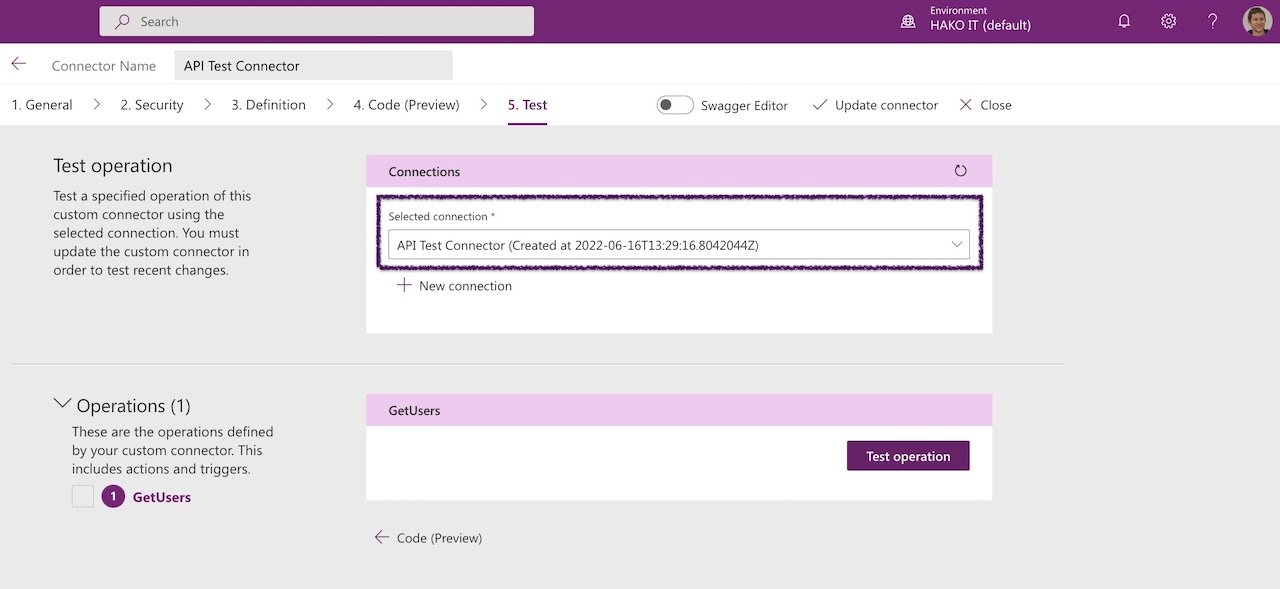
5.3- Test Operation
Select Test Operation.
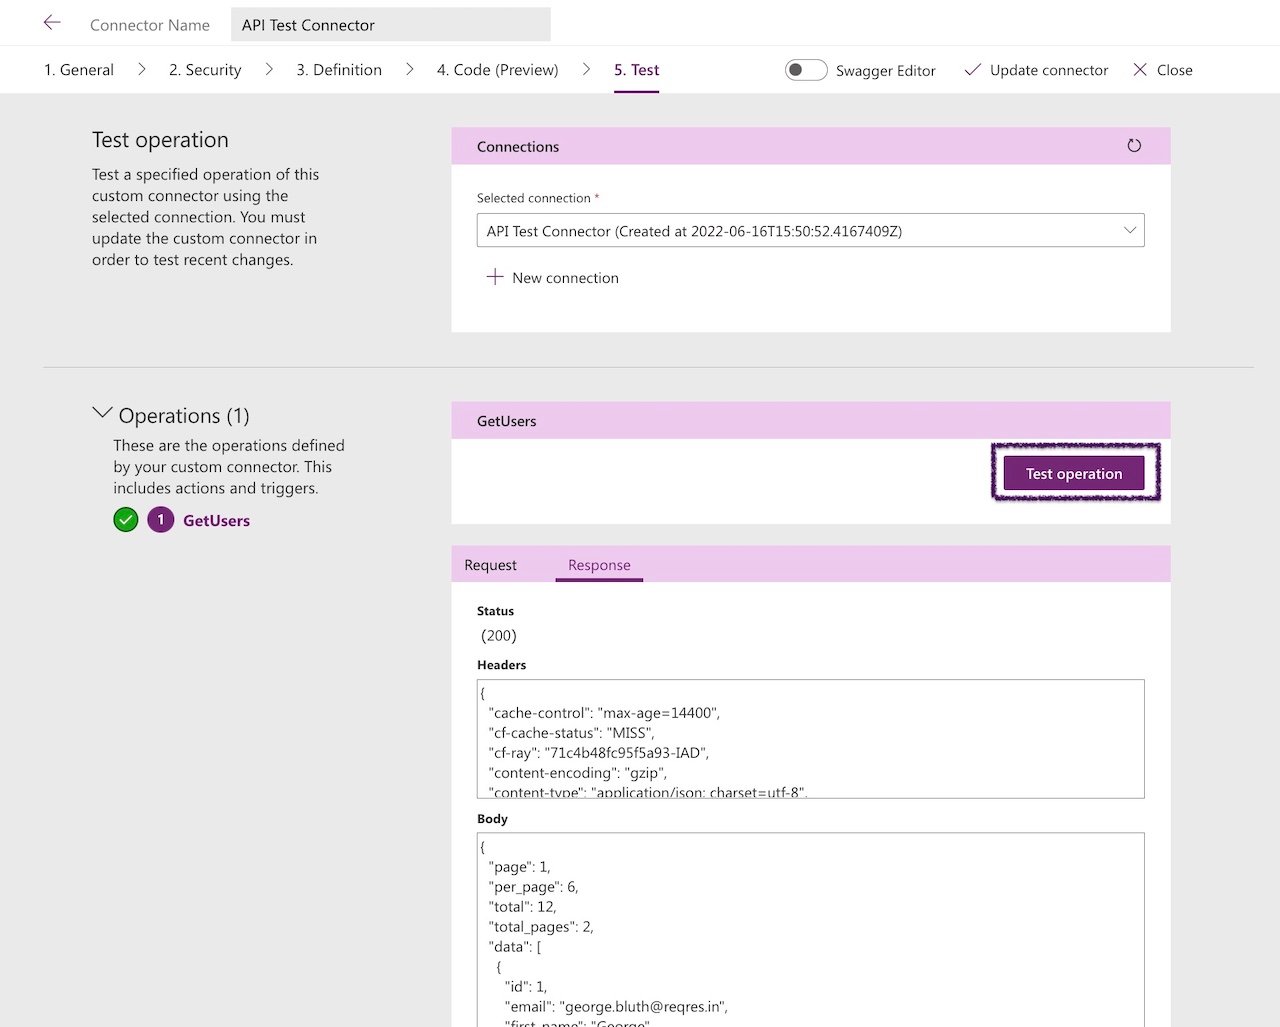
Congratulations! Now you are done, you can use the Custom Connector in Power Apps or Power Automate (ex Flows).
Select Close

How to export/download an existing custom connector on PowerApps?
It is a Best Practice to download all your connectors and use GIT or any other source code management system to save the files.
Easy, Select download on the custom connector:

Scenario #2: How to import an existing custom connector in PowerApps?
1- Select Custom connectors (Navigation pane on the left).
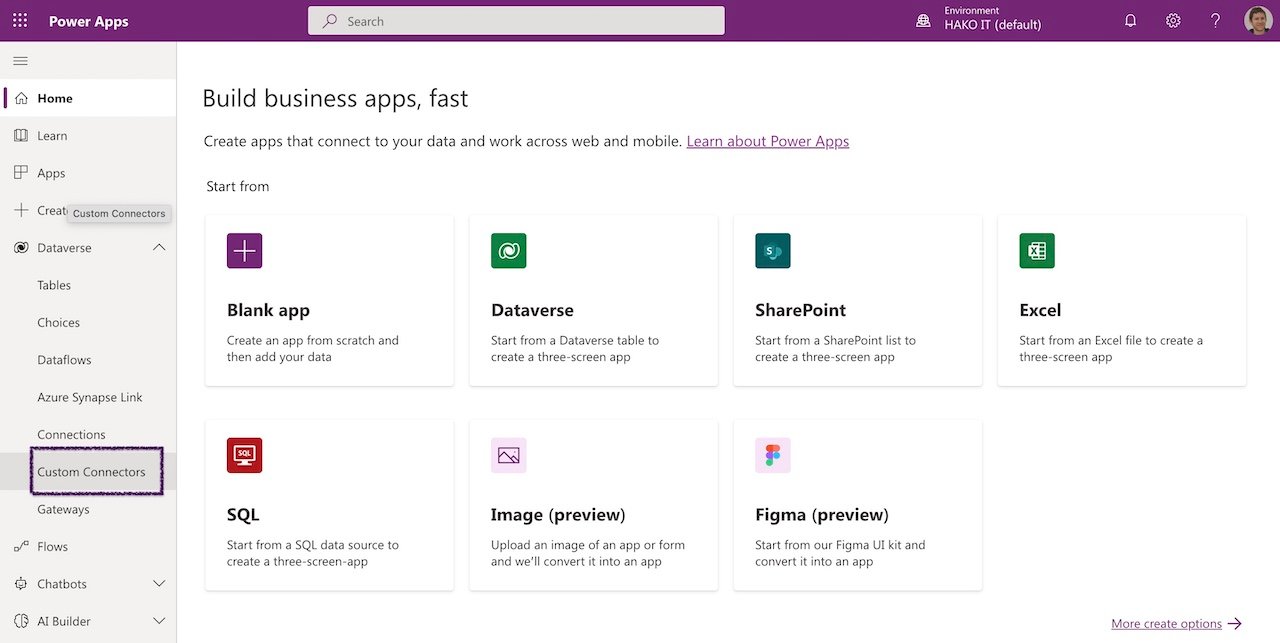
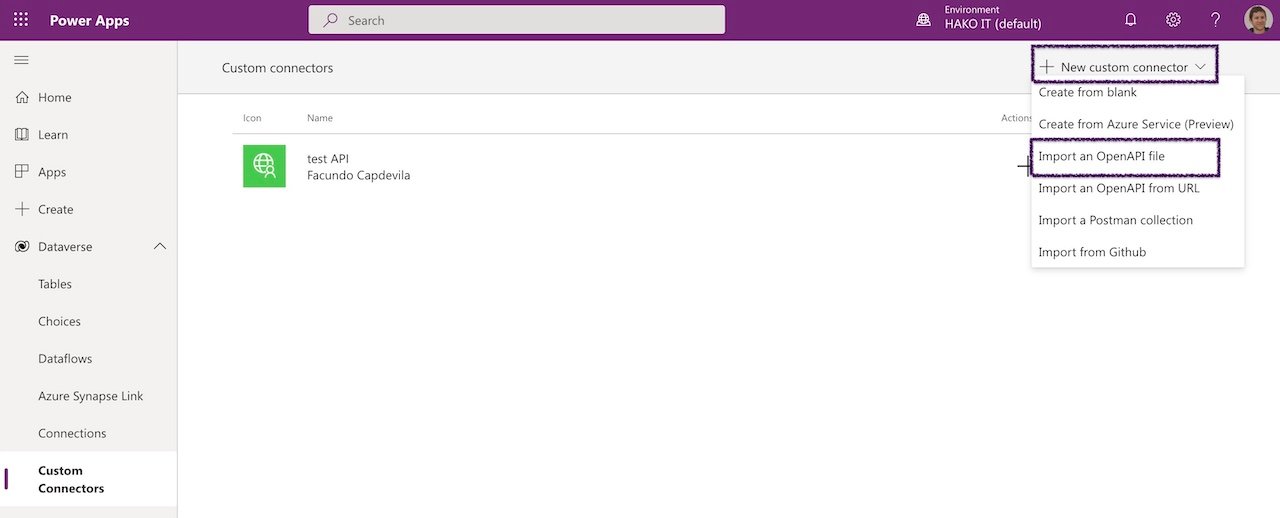
2- Select New custom connector, then choose Import an OpenAPI file.
Note: Another good option is to import a Postman collection (previously, you need export the Collection from Postman).

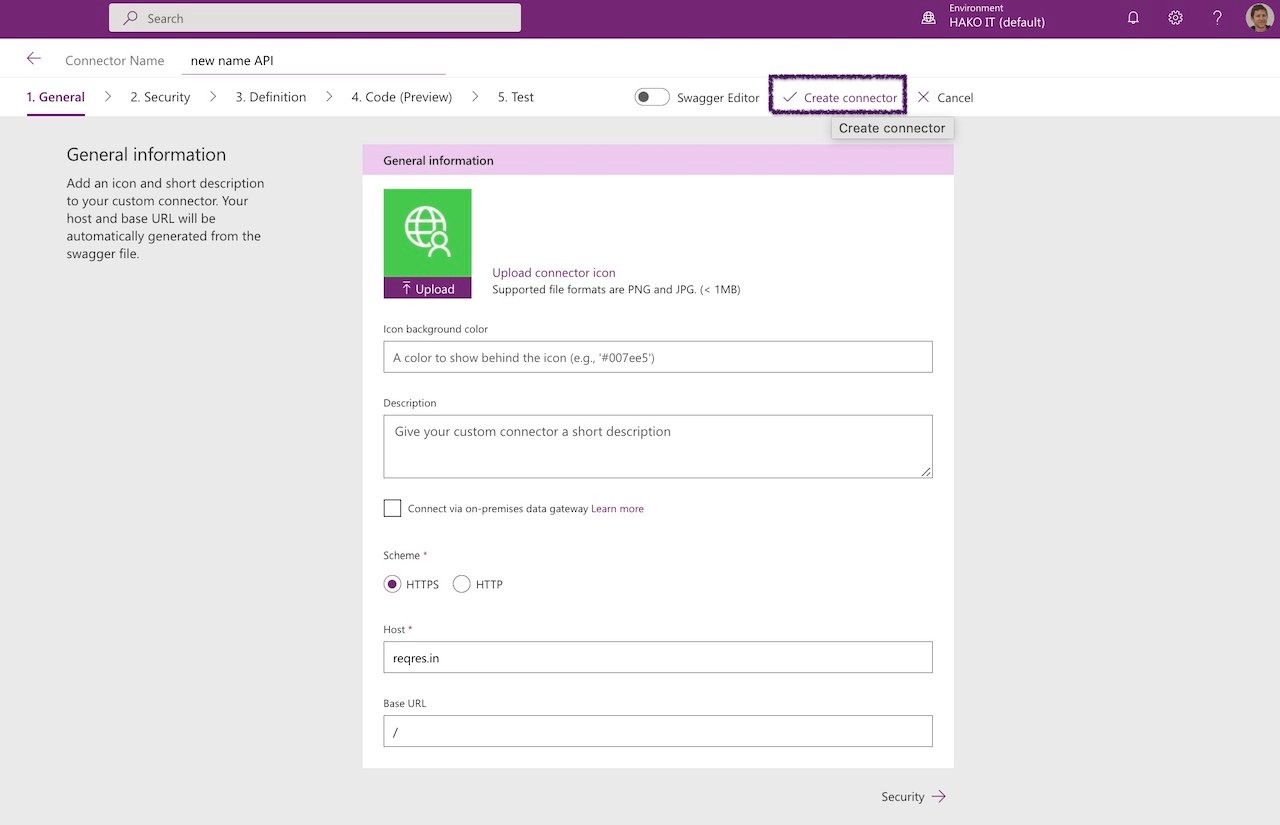
Insert the new name of the custom connector.
Then, select import for searching the file (select your file).
Finally, select Create.
Download working example: API-Test-Connector.swagger.v1.json

Finally, Select Create Connector
Integrating PowerApps with APIs (Custom Connector):
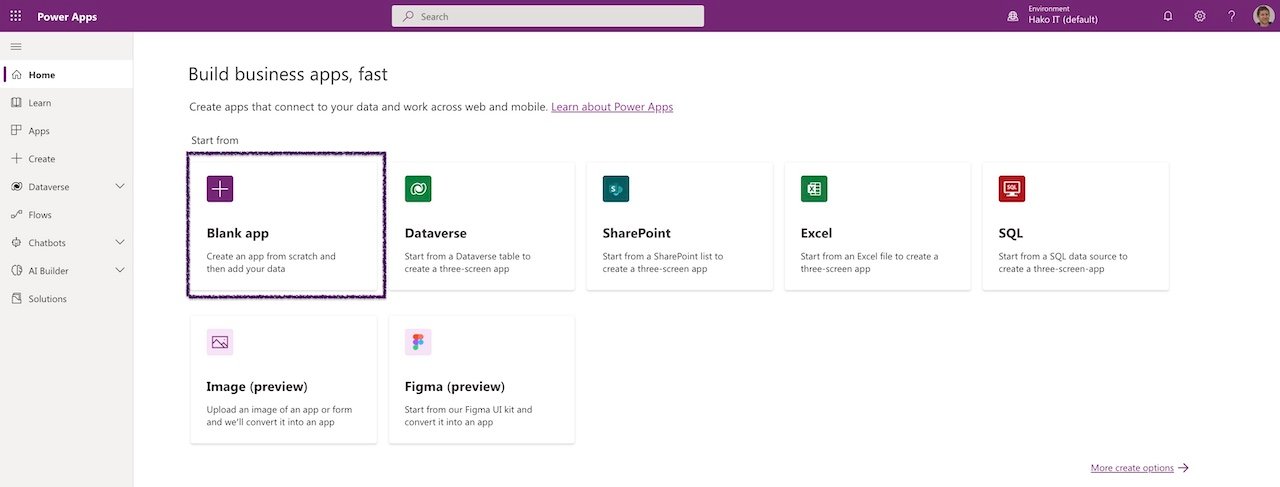
1- Sign in to Power Apps.
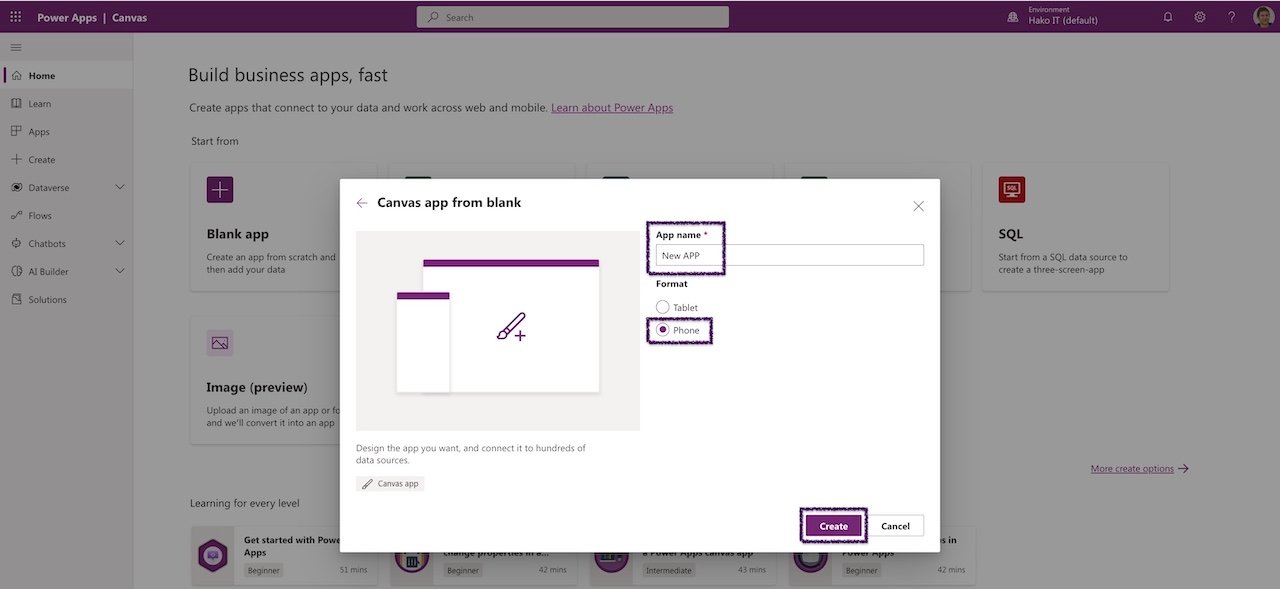
2- Create a new app or use an existing one.
Home > Blank app

3- Add the existing Custom Connector:
On the left pane, Data, Select Add Data,
Select Connectors tab or Find your custom connector name on the list.
Select the custom connector (it will load and create a connection).

4- Verify the Custom Connector:
In the list of connectors, select the custom connector.
On the Data pane, verify that the custom Connector (in this example APITestConnector) is listed.

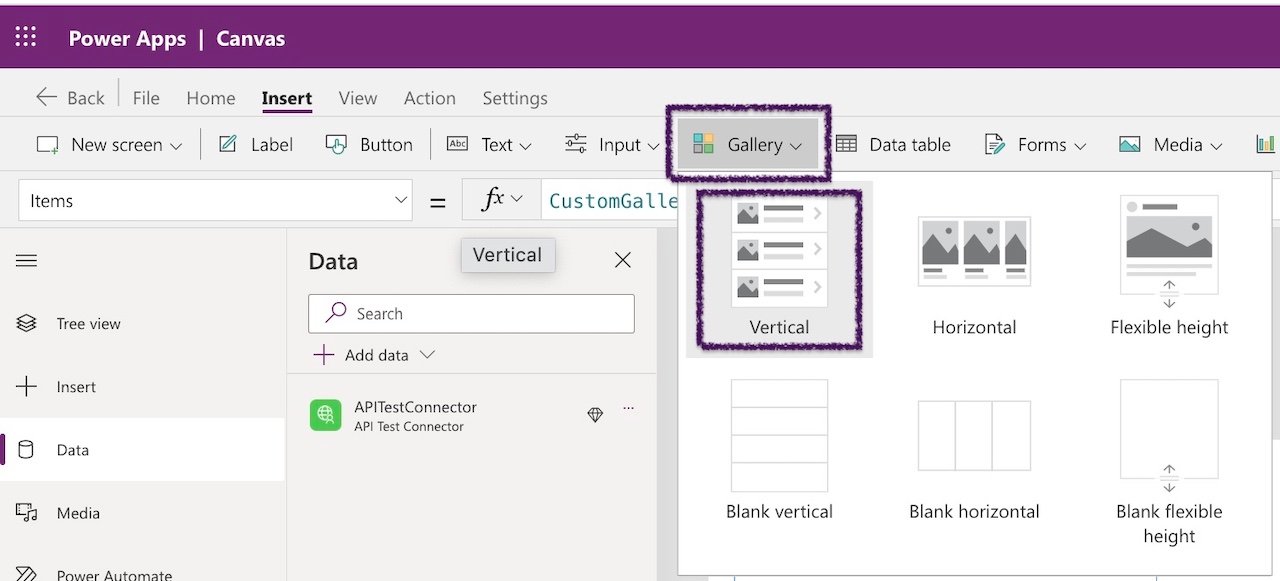
5- We will add a new Gallery to use the Custom Connector and API.
-Insert a Gallery (example vertical).
6- On the Gallery properties, set Items:
APITestConnector.GetUsers().data

7- Change image property to “API.Response.data.avatar”
ThisItem.avatar

8- Change the Text property to:
ThisItem.first_name & ” ” ThisItem.last_name
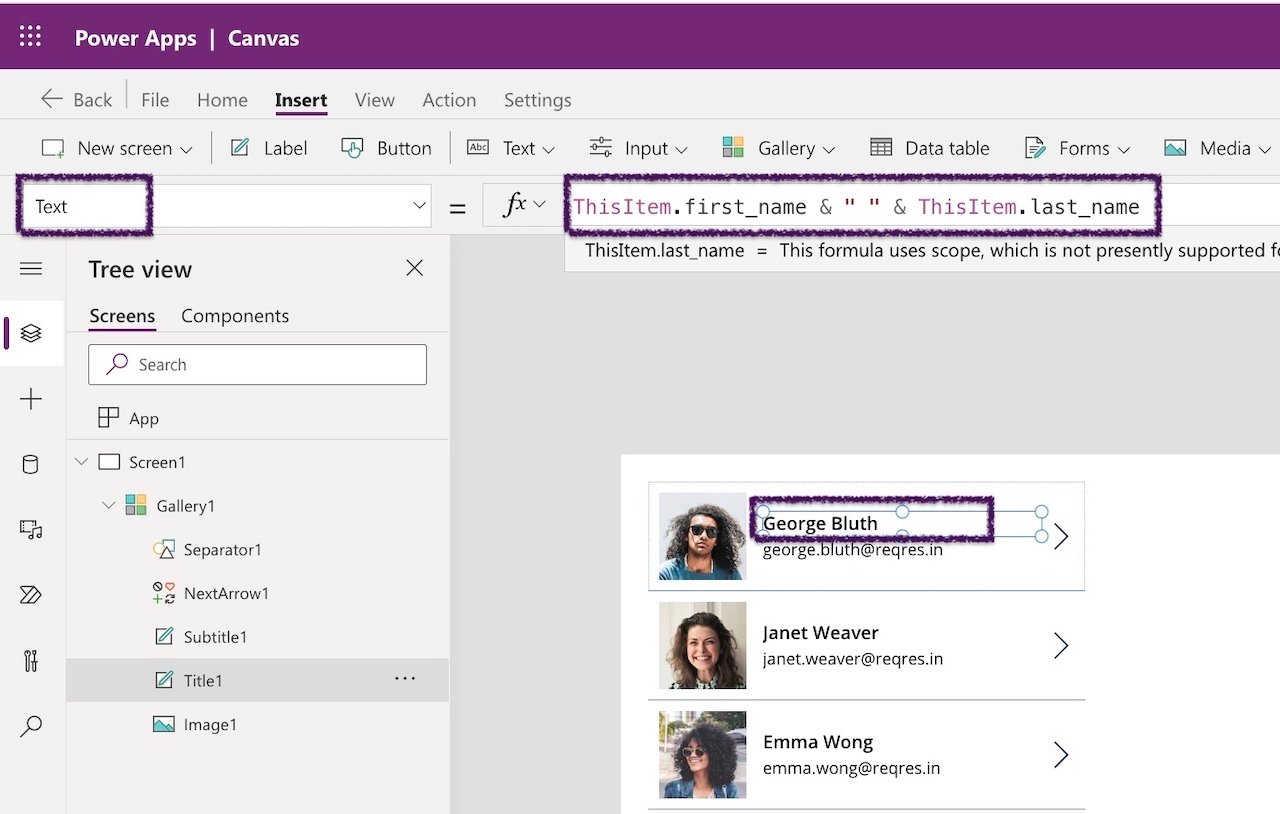
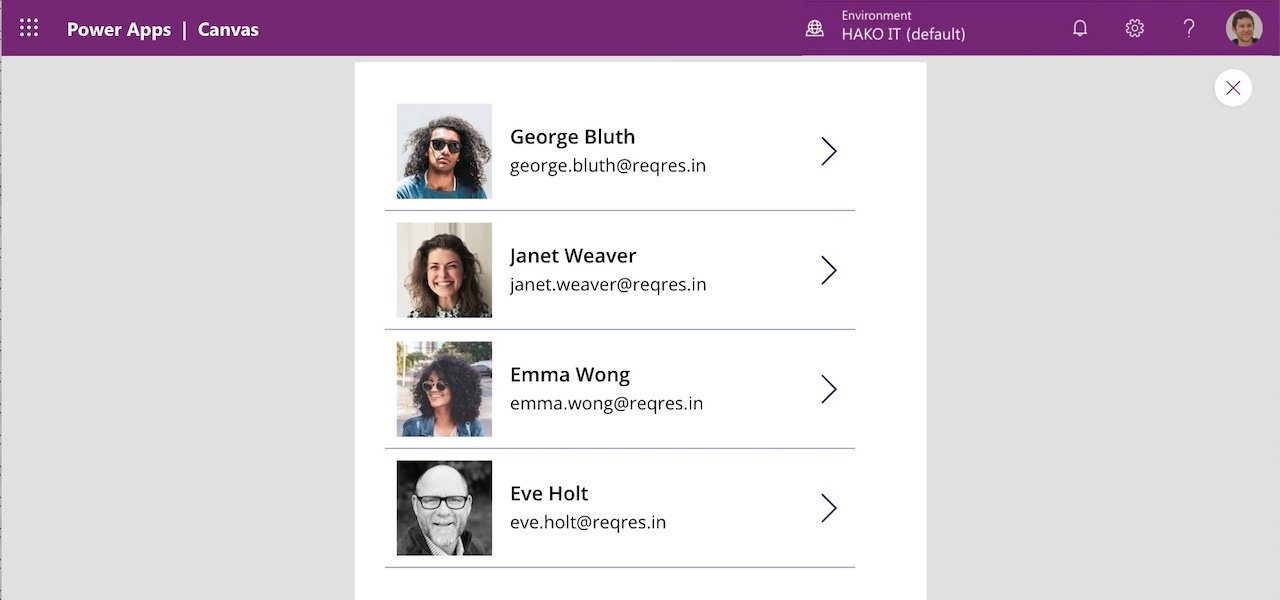
9- Final Result
Congratulations! Now you are done!. You created a custom connector in Power Apps from Scratch and integrated it into a Canvas Power App.
Power Apps Premium Connectors: Costs and Licensing
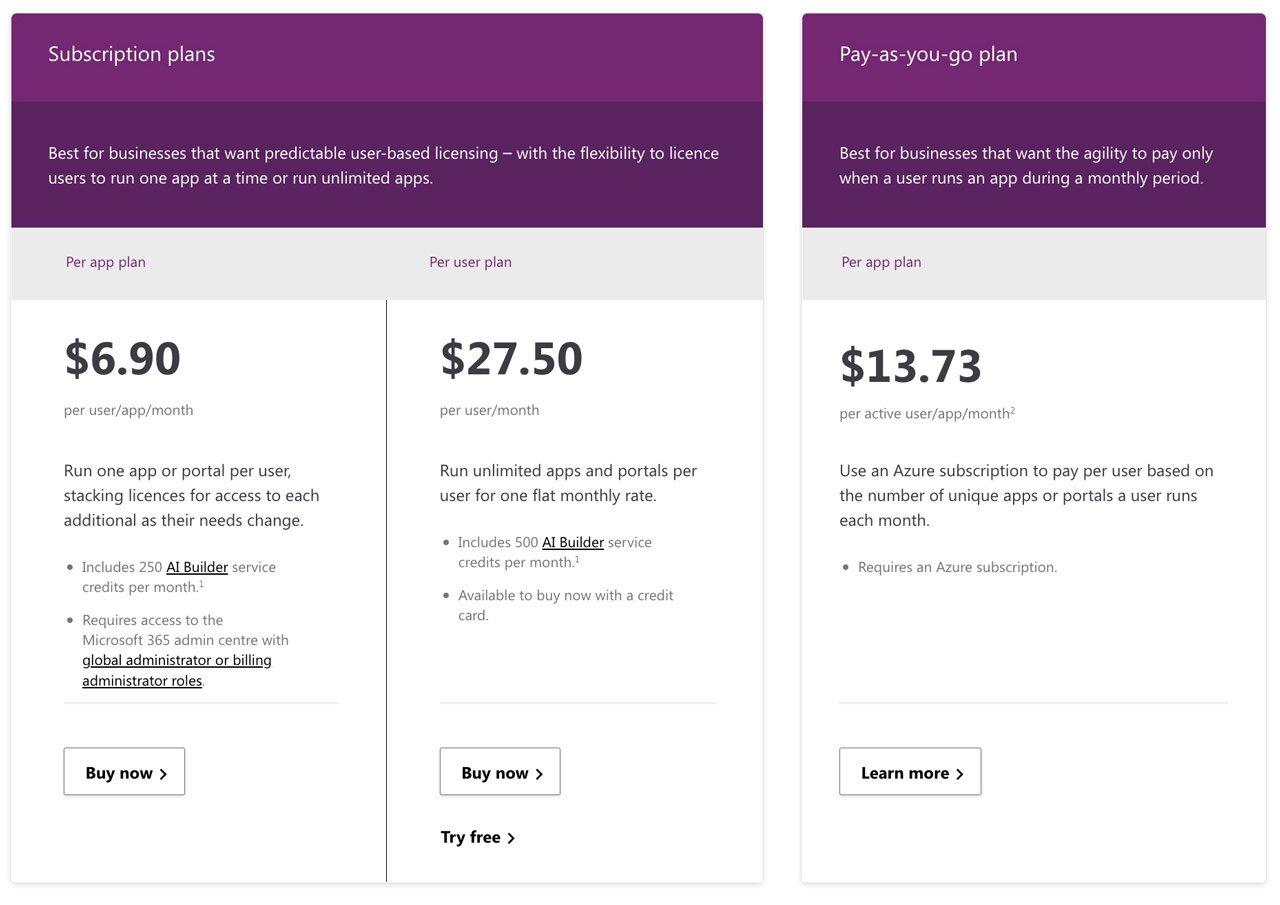
Important: A premium license is required to use custom connectors.
🌟 Power Apps premium connectors also include connections to SQL Server, Dataverse, Salesforce, and more.
License Requirements
Power Apps premium connectors require specific licensing:
| License Type | Included Connectors | Approximate Price |
|---|---|---|
| Power Apps Basic | Standard connectors | Included with Office 365 |
| Power Apps Premium | All connectors + custom connectors | $20 USD/user/month |
| Power Apps per App | Specific premium connectors | $5 USD/user/app/month |
Benefits of Using Custom Connectors in Power Platform
- Integrate with any system or API
- Greater flexibility in your business apps
- Reuse across Power Apps and Power Automate
- Full control over HTTP calls (methods, headers, tokens)
When Do You Need Premium Connectors?
Power Apps premium connectors are required for:
- Custom connectors
- Advanced third-party APIs
- Complex enterprise integrations
- Specific data connectors like SQL Server
Best Practices for Custom Connectors
🔐 Security and Authentication
- Always use HTTPS for production connectors
- Implement proper authentication based on your API
- Validate input data to prevent errors or malicious requests
- Manage access tokens securely
⚡ Performance Optimization
- Limit the number of API calls
- Implement caching when appropriate
- Use pagination for large datasets
- Monitor your connector’s usage regularly
🛠️ Documentation and Maintenance
- Document all available operations clearly
- Maintain version control of your connector
- Test functionality regularly
- Update the connector as the API evolves
Power Apps Custom Connector Extras
How to import an API into Power Apps Video
Troubleshooting: Common Issues
Connection Errors
- Check the API URL
- Confirm the service is available
- Review security settings
Authentication Issues
- Validate API credentials
- Check access tokens
- Confirm user permissions
Response Errors
- Review the expected JSON format
- Validate the data structure
- Confirm field mappings
More Info 🔗: 6 Tips for Troubleshooting Errors in Power Apps | Debugging
Advanced Use Cases
ERP System Integration
Power Platform connectors enable integration with:
- SAP
- Oracle
- Dynamics 365
- Salesforce
Popular Third-Party APIs
- Google APIs
- Twitter API
- ChatGPT API
- E-commerce APIs
Automation with Power Automate
Combine Power Automate connectors for:
- Automated workflows
- Data synchronization
- Smart notifications
- Approval processes
Power Apps Useful Links
Use a custom connector from a Power Apps
Power Apps List of all Power Apps connectors
Custom Connector Power Apps Example information:
– Custom Connector in Power Apps example (GitHub)
Conclusion: Empower Your Apps with Custom APIs!
Creating a custom connector in Power Apps unlocks a world of possibilities for integrating your application with virtually any web service. From simple APIs to complex enterprise systems, custom connectors are the key to maximizing the potential of the Power Platform.
Keep in mind that Power Apps premium connectors require a specific license, but the investment is well worth it for the flexibility and power they provide. With this complete guide, you now have everything you need to create, configure, and deploy your own custom connectors.
🚀 Start connecting your app to external APIs today with your first Power Apps custom connector!
Power Apps Tutorials:
Do you want to continue learning about Power Apps? Take a look at the simple and easy Tutorial for beginners 👨💻👩💻 to Create an application with a Sharepoint List or with Excel:
How to build an app in 30 Seconds – Sharepoint | Microsoft Power Apps
Create an APP with EXCEL in 5 Steps
10 Common POWER APPS Mistakes & How to Avoid Them
20 Power Apps Examples 📱 and Use Cases
👉 Need expert help? Contact us for more information or schedule a meeting with our Power Platform specialists.


